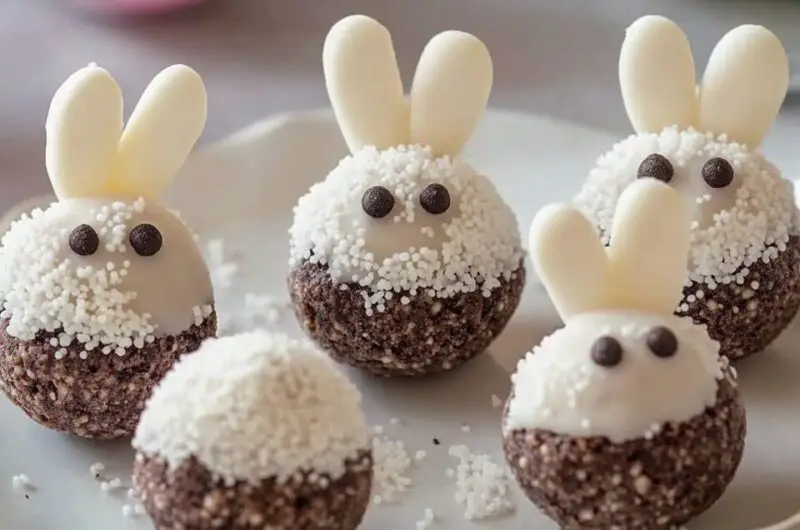
Easter just got sweeter with these Bunny Oreo Balls! This adorable, no-bake dessert combines crushed Oreos and cream cheese into a rich, chocolatey truffle, perfectly coated in white chocolate and decorated with tiny bunny features. Whether you’re making them with kids or for a festive dessert platter, these treats will bring a smile to everyone’s face! Not only are they delicious, but they’re also incredibly easy to customize! Use different colored sprinkles, candy eyes, or even a variety of coatings like milk or dark chocolate. Serve them at Easter brunch, spring picnics, or simply as a fun weekend baking project. These bite-sized delights are as fun to make as they are to eat!
Full Recipe:
Ingredients:
-
1 package (14.3 oz) Oreo cookies
-
1 block (8 oz) cream cheese, softened
-
12 oz white chocolate, melted
-
Pink food coloring (for details)
-
Edible candy eyes
-
Mini marshmallows (for bunny tails)
-
Pink heart sprinkles (for noses)
-
White fondant or candy melts (for bunny ears)
Directions:
-
Crush the Oreo cookies into fine crumbs using a food processor or by placing them in a sealed bag and crushing with a rolling pin.
-
Mix the crushed Oreos with softened cream cheese until fully combined.
-
Roll the mixture into small balls and place them on a parchment-lined baking sheet. Freeze for 15 minutes.
-
Melt the white chocolate and coat each ball completely. Let excess chocolate drip off before placing back on the tray.
-
While the coating is still wet, add the edible eyes and a pink heart sprinkle for the nose.
-
Use white fondant or cut candy melts into small ear shapes and attach them.
-
Dip a toothpick in pink food coloring and add details inside the ears.
-
Stick a mini marshmallow on the back as the bunny tail.
-
Let the Oreo balls set in the fridge for about 20 minutes before serving.
Prep Time: 20 minutes | Chill Time: 20 minutes | Total Time: 40 minutes
Kcal: 180 kcal | Servings: 20 truffles
Bunny Oreo Balls: A Fun and Festive Easter Treat
Easter is a time for celebration, joy, and of course, delicious treats! If you’re looking for a fun, no-bake dessert that will delight kids and adults alike, Bunny Oreo Balls are the perfect choice. These adorable truffle-like sweets combine the rich, chocolatey taste of Oreo cookies with the creamy smoothness of cream cheese, all wrapped up in a sweet white chocolate coating. The best part? They’re shaped like tiny bunnies, making them a picture-perfect addition to any Easter spread.
In this article, we’ll explore everything you need to know about Bunny Oreo Balls, including why they’re a great choice for Easter, tips for making them even more adorable, variations to try, and how to store them for the best results.
Why Bunny Oreo Balls are the Perfect Easter Treat
Easter is synonymous with cute, pastel-colored desserts that bring a smile to everyone’s face. Bunny Oreo Balls fit right into the festive mood with their adorable bunny design and irresistible taste. Here’s why they’re an absolute must-have on your Easter table:
1. No-Bake and Easy to Make
One of the biggest advantages of making Bunny Oreo Balls is that they require no baking at all! That means you can whip up a batch without worrying about preheating the oven or waiting for the perfect bake time. The entire process is simple enough for kids to join in, making it a great family-friendly kitchen activity.
2. Perfect for Kids and Adults
Who doesn’t love Oreo cookies and chocolate? Bunny Oreo Balls are a hit with kids because they’re sweet, fun to eat, and easy to hold. Adults love them too because they satisfy chocolate cravings without being overly rich or heavy. Plus, they make for beautiful table decorations at Easter gatherings.
3. Customizable for Any Occasion
Although they’re designed for Easter, Bunny Oreo Balls can easily be adapted for other occasions. By changing the color of the chocolate coating, sprinkles, or decorations, you can create themed treats for birthdays, baby showers, or even Christmas!
Tips for Making Your Bunny Oreo Balls Extra Cute
The charm of these truffles lies in their bunny design, so here are some tips to make sure they turn out as adorable as possible:
1. Use Fondant or Candy Melts for Ears
For perfectly shaped bunny ears, you can use white fondant, marshmallow pieces, or cut-out candy melts. Fondant is a great option if you want full control over the size and shape. If you’re in a rush, simply cut mini marshmallows diagonally and use the sticky inside to attach them to the Oreo balls.
2. Add Pink Food Coloring for Details
A tiny touch of pink inside the ears makes a big difference in bringing these bunnies to life. Dip a toothpick in pink food coloring or edible paint and lightly brush the inner part of the ears for an extra cute effect.
3. Use Edible Candy Eyes for Expression
Small candy eyes are the easiest way to give your bunnies personality. If you don’t have them, you can make eyes with tiny drops of melted chocolate or use mini chocolate chips.
4. Mini Marshmallow Tails for a Fluffy Finish
A bunny wouldn’t be complete without a fluffy tail! Mini marshmallows make the perfect tail for your Oreo Balls. Just stick them onto the back while the chocolate coating is still wet.
Delicious Variations to Try
While the classic Bunny Oreo Ball recipe is a crowd-pleaser, you can easily switch things up to create new flavors and textures. Here are some fun variations to try:
1. Golden Oreo Bunny Balls
If you prefer a lighter, vanilla-based flavor, swap out regular Oreos for Golden Oreos. This version pairs beautifully with white chocolate coating and makes for an even softer, creamier bite.
2. Chocolate Lovers’ Edition
For a richer, more indulgent treat, use milk or dark chocolate instead of white chocolate for the coating. You can also mix in mini chocolate chips or drizzle some extra melted chocolate on top.
3. Funfetti Bunny Balls
For a colorful, birthday-cake-inspired version, mix some rainbow sprinkles into the crushed Oreo and cream cheese mixture. Then, sprinkle a few extra on top of the white chocolate coating before it sets.
4. Peanut Butter Bunny Balls
If you love the combination of peanut butter and chocolate, add a spoonful of peanut butter to the Oreo mixture before rolling the balls. This will create a creamy, nutty surprise inside every bite.
How to Store and Serve Bunny Oreo Balls
Bunny Oreo Balls are best enjoyed fresh, but they can be made ahead of time and stored for later. Here’s how to keep them tasting their best:
1. Refrigeration
Since these treats contain cream cheese, they need to be stored in the refrigerator. Place them in an airtight container and they’ll stay fresh for up to 5 days.
2. Freezing for Long-Term Storage
If you want to make them well in advance, you can freeze Bunny Oreo Balls. Just arrange them in a single layer on a baking sheet, freeze them for about an hour, and then transfer them to a freezer-safe bag. They can last up to 2 months in the freezer. Before serving, let them thaw in the fridge for a few hours.
3. Serving Tips
Bunny Oreo Balls look best when served on a pastel-colored plate or in decorative paper cups. You can also place them in an Easter-themed basket for a festive presentation.
Conclusion:
Bunny Oreo Balls are the ultimate Easter treat cute, delicious, and incredibly easy to make. With their creamy Oreo filling, smooth chocolate coating, and charming bunny decorations, they’re perfect for holiday gatherings, school parties, or as a fun activity with kids.
Whether you stick to the classic recipe or experiment with different flavors, these bite-sized delights will be a favorite among your family and friends. So, hop into the kitchen and give them a try this Easter you won’t be disappointed!