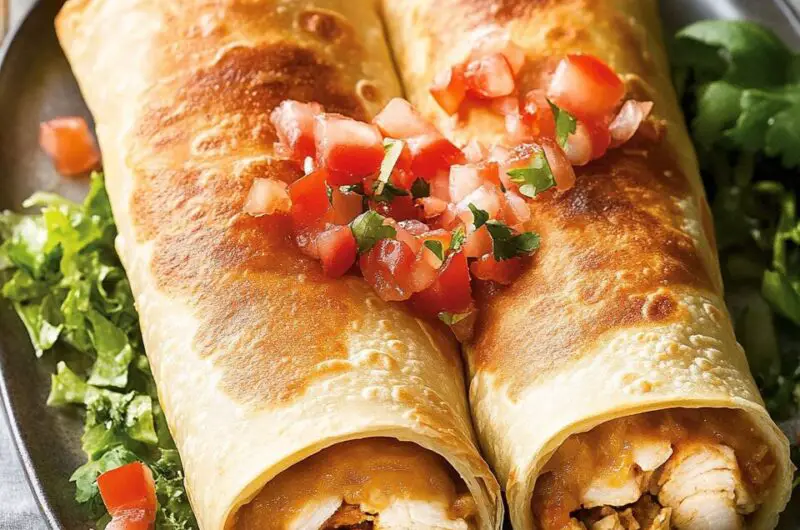
These Baked Chicken Chimichangas are the perfect fusion of bold Mexican flavor and easy weeknight cooking. With a filling of tender shredded chicken, creamy sour cream, melty cheese, and just the right kick from green chilies and salsa, each bite is a cheesy-crunchy delight. Baking instead of frying makes them a lighter option, without compromising on that golden, crispy texture everyone loves. Whether you’re feeding a family or meal-prepping for the week, these chimichangas are a crowd-pleaser. Pair them with your favorite toppings like guacamole, extra salsa, or a dollop of sour cream—and you’ve got a restaurant-worthy meal at home. Ready in under 45 minutes, they’re a fantastic go-to for busy nights when you still want to bring bold flavor to the table.
Full Recipe:
Ingredients:
-
2 cups cooked, shredded chicken
-
1 teaspoon ground cumin
-
1/2 teaspoon chili powder
-
1/2 teaspoon garlic powder
-
Salt and pepper, to taste
-
1 (4 oz) can diced green chilies
-
1/2 cup salsa
-
1/2 cup sour cream
-
1 1/2 cups shredded Monterey Jack cheese
-
6 large flour tortillas
-
Cooking spray or olive oil spray
-
Optional toppings: sour cream, salsa, guacamole, chopped cilantro
Directions:
-
Preheat oven to 400°F (200°C). Line a baking sheet with foil or parchment paper.
-
In a large bowl, combine shredded chicken, cumin, chili powder, garlic powder, salt, pepper, green chilies, salsa, sour cream, and shredded cheese. Mix until well blended.
-
Warm the tortillas slightly to make them easier to roll.
-
Divide the chicken mixture evenly among the tortillas. Fold in the sides and roll up burrito-style.
-
Place the chimichangas seam-side down on the prepared baking sheet. Lightly spray or brush the tops with cooking spray or olive oil.
-
Bake for 20–25 minutes, or until the tortillas are golden brown and crispy.
-
Remove from oven and let rest for 5 minutes before serving. Top with your favorite garnishes like sour cream, salsa, or guacamole.
Prep Time: 15 minutes | Cooking Time: 25 minutes | Total Time: 40 minutes
Kcal: 420 kcal | Servings: 6 servings
Baked Chicken Chimichangas – A Healthier Twist on a Classic Mexican-American Favorite
Chimichangas are a staple in Tex-Mex and Mexican-American cuisine, celebrated for their crisp texture, flavorful fillings, and irresistible charm. Traditionally deep-fried, a chimichanga is essentially a burrito that’s been taken to the next level wrapped, filled, and fried to golden perfection. While frying delivers an undeniably crunchy bite, it also adds unnecessary fat and calories.
That’s where baked chicken chimichangas come in.
In this healthier twist, the chimichanga is oven-baked rather than deep-fried. The result? A delightfully crispy shell without the heaviness of frying still full of flavor, still golden, and still perfectly satisfying. With the right blend of spices, creamy additions like sour cream and cheese, and the sharp bite of green chilies and salsa, this dish brings all the comfort of the original with a guilt-free bonus.
The Origins and Evolution of the Chimichanga
The chimichanga’s origins are widely debated. Some claim it was born in Arizona, others suggest its roots are in Mexico. One popular legend tells of a Tucson-based restaurant owner who accidentally dropped a burrito into a deep fryer and shouted a minced Spanish curse word, “chimichanga,” giving the dish its quirky name.
Regardless of its disputed beginnings, the chimichanga quickly gained popularity throughout the southwestern United States and beyond. Over time, it has taken on countless variations—filled with everything from beef and beans to vegetables and seafood. The baked version has grown in popularity in recent years due to increasing awareness of healthy eating without compromising on taste.
Why Bake Instead of Fry?
The most significant difference between a traditional chimichanga and a baked one is, of course, the cooking method. Baking eliminates the oil bath, drastically cutting down on calories and saturated fat. But there’s more than just the health factor:
-
Crisp Texture Without the Grease: Thanks to modern ovens and air-fryers, we can now achieve that same crunchy exterior without needing to deep fry. A light brush or spray of oil is all it takes.
-
No Mess, Less Stress: Baking is cleaner and easier. There’s no hot oil to handle, no splatter to clean, and no smell of frying lingering in your kitchen.
-
Great for Batch Cooking: You can bake multiple chimichangas at once, making it perfect for family meals, meal prep, or casual entertaining.
Flavor Profile and Texture
This particular chicken chimichanga recipe is a flavor explosion. It starts with tender, shredded chicken that’s seasoned with warm, smoky spices like cumin, garlic powder, and chili powder. The addition of green chilies adds a mild heat, while the salsa contributes a vibrant tang that cuts through the richness of the cheese and sour cream.
The filling is creamy, savory, and melty thanks to the Monterey Jack cheese and sour cream. Wrapping this luscious mixture in a flour tortilla and baking it brings everything together, creating a contrast between the crispy tortilla and the gooey, flavorful center.
Each bite delivers warmth, spice, texture, and comfort.
How to Get That Perfectly Crispy Baked Shell
You might be wondering: how can you replicate that fried crunch in the oven? Here are a few tips:
-
Use High Heat: Bake your chimichangas at 400°F (200°C) or higher to ensure the tortillas get crispy and golden without drying out the filling.
-
Don’t Overfill: Overfilling the tortilla makes it harder to seal and can lead to bursting. Keep the filling generous but manageable.
-
Spray or Brush with Oil: Lightly coat the tops and sides of your wrapped chimichangas with a neutral cooking spray or a thin layer of olive oil. This helps the tortillas brown and crisp evenly.
-
Flip Once Mid-Bake (Optional): For even crispness, you can flip them halfway through baking, although it’s not required if you prefer a softer bottom and crisp top.
Serving Suggestions
Baked chicken chimichangas are incredibly versatile and can be served in countless ways, depending on the occasion and your guests. Here are a few ideas:
-
Classic Plate Presentation: Serve them hot on a plate, topped with a dollop of sour cream, spoonful of salsa, guacamole, and a sprinkle of chopped cilantro.
-
With Sides: Pair them with Mexican rice, refried beans, or a simple corn and black bean salad for a complete meal.
-
Party-Style: Cut them in halves or quarters and serve as finger food for parties with small ramekins of salsa and queso for dipping.
-
Kid-Friendly Twist: Serve them plain or with just cheese and chicken inside for picky eaters, along with a mild dip like ranch or ketchup.
Customization Ideas
This recipe is highly adaptable. You can switch up the ingredients depending on your preferences, dietary needs, or what you have on hand:
-
Meat Options: Use leftover rotisserie chicken, grilled chicken breast, shredded pork, or even ground beef.
-
Vegetarian: Swap chicken for sautéed mushrooms, seasoned black beans, or a mixture of quinoa and veggies.
-
Cheese Choices: Monterey Jack works beautifully, but you can experiment with cheddar, pepper jack, or a Mexican cheese blend.
-
Spice Levels: Adjust the heat by choosing mild or hot salsa, adding jalapeños, or using spicy seasoning blends.
-
Low-Carb: Use low-carb tortillas or even lettuce wraps for a keto-friendly version (though you’ll lose the crispy shell).
Storage and Reheating Tips
These baked chimichangas store exceptionally well, making them perfect for meal prep or leftovers:
-
Fridge: Store cooled chimichangas in an airtight container in the refrigerator for up to 4 days.
-
Freezer: Wrap each chimichanga in foil or plastic wrap, then place in a freezer-safe bag. They can be frozen for up to 3 months.
-
Reheating: Reheat in the oven or air fryer at 350°F (175°C) until warmed through and crispy. Avoid microwaving if you want to maintain the crunch.
Nutrition and Health Notes
By baking instead of frying, you significantly reduce the fat content of this dish without losing any of the flavor. Using lean protein like chicken breast, moderate amounts of cheese, and whole-wheat tortillas can make this dish even more nutritious.
Advertisement
You also control the sodium levels by using low-sodium salsa or making your own spice blend. This dish can easily be made gluten-free by using gluten-free tortillas, and it can be made dairy-free by using plant-based sour cream and cheese.
Conclusion:
Baked Chicken Chimichangas are the perfect solution for anyone craving that deep-fried crunch and Tex-Mex flavor without the heaviness or hassle of frying. They’re warm, cheesy, savory, and endlessly customizable. Whether you’re making dinner for the family, prepping lunches for the week, or just looking for something comforting, this recipe delivers on all fronts.
By baking instead of frying, you’re embracing a healthier approach without sacrificing the flavors and textures that make chimichangas such a beloved dish. Give them a try, and they might just become a staple in your household meal rotation.


